Sunday, January 30, 2011

Bottle and Balloon Volcano

We had the TV on in the afternoon the other day and I saw a childrens show (not sure what it was called sorry) where they blew a balloon up inside a plastic PET bottle as part of an experiment demonstrating how air takes up space even though you can't see it. The kids on the show then filled the balloons with water and tied them off so the water balloons were trapped inside the bottle.
I thought it looked super cool so we had a go at it today and improvised a little to create a bit of volcano action (always a topic of interest around here ;-D).

WE USED:

* empty clean 2L PET bottle with lid
* balloon
* water
* food colouring (optional, we coloured our water red because after the first few tries Bubble wasn't impressed with transparent 'lava' :-D)
* tool to make small hole in bottle (we used a sharp tip knife, a nail or thick embroidery needle could also work).

Insert the balloon into the neck of the bottle and then stretch the open end of the balloon over the mouth of the bottle.

Ask your child to try blowing up the balloon - they wont be able to do it because of the air already inside the bottle. Even though they can't see it it is there taking up space.

Using your sharp implement (we used a knife - very carefully of course!) make a small hole in the bottom of the bottle.

Try blowing up the balloon again and voilĂ  - success! Explain that the air has moved the make room for the balloon because it can escape from the hole you have made. Cover the hole with your finger and the balloon will stay inflated.

Keeping the hole covered with your finger fill the balloon with water. Be sure to keep the hole in the bottle covered even when the balloon is full.

Replace the cap and you should be safe to take your finger off the hole (release it slowly in case the lid leaks, ours was fine though). You now have a balloon full of water inside a bottle; I'm sure you can guess what comes next!

Once the lid is removed the water explodes from the bottle as the air rushes back in through the hole in the base to push it out.

Bubble was however unimpressed with water as 'lava', so we did it again putting red colouring in the balloon before blowing it up and filling with water. I sat the bottle in a dish to make clean up of the red water easier.

When the flow started to lag a bit (the subsequent 'eruptions' were less and less explosive, Im guessing because the top of our balloon got a few holes in it) Bubble gave the bottle a squeeze to ramp up the action...

... just a little :-)


This activity was definitely a hit - water, volcanos and squeezing stuff, how could it fail :-)


Saturday, January 29, 2011

Rainclouds In The Bathtub

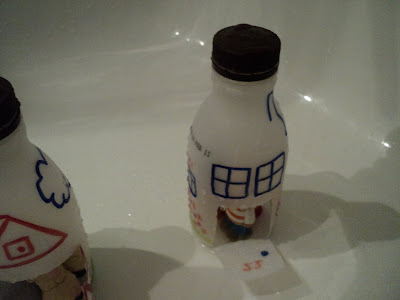
Bubble has been begging to use the 'bottle raincloud' we made a few days ago when we planted our grass seeds, so today we made a slightly bigger one using a milk bottle and had some fun in the bathtub making it rain. I'd made some bottle houses the night before (inspired by this post at Childhood 101) that were *hopefully* waterproof, so Bubble put them to the test.
She really enjoyed this activity and played happily for about 40 minutes (I say 'about' because I had other plans with a peice of cake and a book :-D) making it rain again and again while her little people came out to jump in puddles between showers.

WE USED:

* empty clean plastic milk bottle
* paring knife or similar (for punching holes)
* permanent markers
* water
* other empty plastic bottles/containers if you want to make houses.

On one side of the milk bottle I punctured some small holes using a paring knife tip. Then on an adjoining side drew a sun (making sure when the sun side was held upright the side with the holes faced upwards, so it wouldn't 'rain' when the sun was out).

On the opposite side I drew some rainclouds (so when this side is upright the side with the holes faces down, making it rain).

I made a bottle barn for the Little People animals to shelter in.

And a bottle house for the Little People to take cover inside from the deluge.


We put our bottle house and barn in the bathtub where Bubble could make it rain to her hearts content :-)


Everybody safely inside, I think there's a storm coming!

When Bubble held the milk bottle cloud rainy side out the water came tumbling down (sorry the photo is so dodgy, there is rain there I promise :-D).


Bubble was delighted controlling the weather in her mini world, and the Little People weren't too upset about having puddles to jump in either ;-)

Hummingbird Cake Recipe

I'll only go on record as making the following statement once; cake isn't all that healthy for you. Unfortunately it's one of those 'sometimes' foods rather than an 'all the time' type food, but some cakes are healthier than others (that's my theory anyway ;-D). Hummingbird cake has to be at least a little on the healthy side; it has pineapple, banana and walnuts in it after all! This recipe was so easy to follow and great for cooking with the kids (and did I mention yummy? It was yummy).

Ingredients:

1 3/4 cups SR flour
1 cup brown sugar
1 tsp bicarb soda
1/2 cup desiccated coconut
1/2 cup chopped walnuts
1 tsp ground cinnamon
2 bananas (mashed)
440g can crushed pineapple (drained)
2 eggs (whisked)
3/4 cup oil

Method:

Preheat oven to 160'c
Combine the dry ingredients in a large bowl (flour, sugar, coconut, walnuts, bicarb soda, cinnamon).
Add wet ingredients (mashed banana, drained crushed pineapple, oil and eggs).
Mix until combined.
Pour into greased cake tin and bake around 30-40 minutes or until skewer comes out clean.

Top with cream cheese icing (1.5 cups icing sugar, 50 butter, 1 tsp vanilla, 100g cream cheese) or just use butter as you would with banana bread.

The cake we made was a tiny bit dry, Id love to give this one a try next:

Taste Recipe for Hummingbird Cake

Friday, January 28, 2011

14 Ways I Love You - Valentine Garland

Valentines Day is coming up and what better excuse is there to make cute little heart shaped activities! We used an old cardboard box to create a pretty lacing garland for Bubble's wall that she enjoyed threading herself. We will use the garland in the 14 days leading up to Valentines Day to create a keepsake full of reasons why we love her to bits :-)

WE USED:

* thick cardboard (we used the sides from an old box)
* large and small heart shape cookie cutters
* marker/pen/pencil
* scissors
* wool/twine/ribbon
* child safe needle
* coloured contact (we used red)

For more Valentines inspired ideas check out:

Toddler Approved!
Tales Of An Aussie Mum
Jada Roo Can Do
The Imagination Tree

I used a large cookie cutter to trace 14 heart shapes onto thick card and then cut them out.

Then made two holes in the top of each heart using a hole punch so they could be threaded onto some wool using a child friendly needle.
(If you don't have a needle check out this earlier post to see how to make one using pipecleaners).

Bubble sat for ages carefully threading and spacing her hearts along a length of wool.


We then hung her heart garland along her bedroom wall above her bed.

Using a small shaped cutter I traced 14 hearts onto the back of a sheet of red contact paper.

On each heart I will write something I love about Bubble to create little 'Ways I Love You' stickers that can be added to her heart garland.

Every night before Bubble goes to bed during the 14 days leading up to Valentines I will give her another 'sticker' for us to read together and add to her wall.
I've also made a garland for Squeak's wall and hung it above her cot, she might be a bit young to know what it's all about but she's definitely old enough to understand that we love her :-)
Im looking forward to adding these to the girl's keepsake boxes and maybe in future years when they are older they can make garlands for themselves or each other.

“Come over to play at the Childhood 101 We Play link up”

We Play


Wednesday, January 26, 2011

Felt Flags - Australia Day

Happy Australia Day!

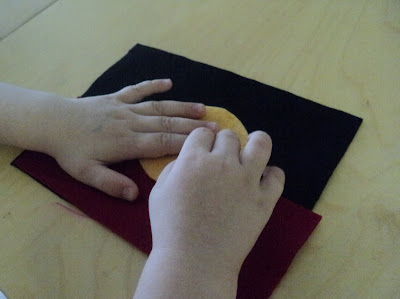
It was a real scorcher here so we kept the girls indoors for the majority of the day until it cooled down enough to head outside. While we relaxed the day away (in true Aussie fashion!) Bubble enjoyed this flag assembly game I cut out for her last night from felt sheets.

WE USED:

* felt sheets (red, white, blue, yellow, black)
* scissors
* air erasable pen

I cut out the parts for making both the Australian National flag and the Australian Aboriginal flag from sheets of felt. The stars on the National flag are very dodgy unfortunately, I didnt realise how tricky 7 point stars are to draw!

Bubble used small pictures of each flag as a guide while she assembled them.


She did a very good job I thought! Bubble really liked this activity and is quite fascinated with flags in general, so I think I will make some more of these to represent flags of other countries.

Monday, January 24, 2011

'G' is for Grass

Sticking with our letter G theme we had a go at growing some grass today. The girls water table was standing idle so we used one side of it for our little grass garden and got out some stencils to create interesting shapes. Can't wait until the shoots come through, I wonder how clear our butterfly and snail outlines will be?

WE USED:

* planting container (we used an empty water table)
* grass seeds
* soil
* large stencils
* plastic bottle
* knife/sharp scissors
* marker
* water

I loosened the plug before we added the soil so that excess water could drain out of the tub.

Bubble half filled one side of the table with soil using a cup and then pat it all gently flat.

She chose two stencils for her garden and we laid them flat on the soil. Bubble then filled in the blank areas with grass seeds.

She made a snail and a butterfly shape for her garden, they turned out very clear!


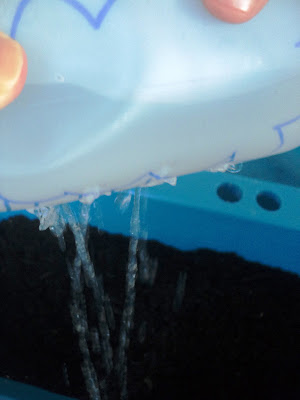
We carefully covered the seeds with another layer of dirt and then it was time for watering. Instead of a watering can I made Bubble a 'rain cloud' from an empty bottle; I drew a cloud on either side with permanent marker and then carefully punched small holes in the underside of the bottle using the tip of a paring knife. I half filled it with water and held the bottle with the holes at the top so the cloud would only 'rain' when Bubble rotated it downwards.

Showing Bubble how to turn her cloud bottle downward to make raindrops.

Some rain for our grass garden :-)